SpinupWP is a fantastic service (I can confidently say that, having spent 4 years helping to build it). The server control panel gives you everything you need to host WordPress sites that are lightning-fast and secure; at a reasonable price point. Sites hosted using SpinupWP are so quick, thanks to their server-based caching solutions. Every base is covered, from page caching to object caching to browser caching, so we won't be digging into caching techniques in this post.
Before digging into the optimizations, we must understand why high-traffic sites can be further optimized for performance and reliability. As I've already said, SpinupWP is excellent. However, one of its super-powers is flexibility, meaning it has to cater to so many varying use cases. From users hosting a single site on a server to agencies hosting 10-20 brochure-style sites per server. It's also possible to connect any Ubuntu server (running the latest LTS release) with different hardware configurations. As you're probably starting to realize, there are so many permutations of hardware and site combinations that it's impossible for SpinupWP to tune each server perfectly for its intended use case.
Every server provisioned using SpinupWP is configured exactly the same way. Likewise, each site deployed on SpinupWP uses the same default templates for Nginx and PHP-FPM. While the default configs shipped with SpinupWP implement the latest best practices, they're not dialed in for every use case. This is especially true for high-traffic sites or sites with more dynamic content. For most other sites, the default configs will serve you very well.
One final thing to mention regarding high-traffic sites is that they should reside on their own server. You don't want other sites competing for server resources if you're aiming for optimal performance. With that out of the way, let's begin.
It starts with the right server
You can't out-tune a cheap, underpowered server. If you're serious about performance and reliability, you must invest in a quality server. That means choosing a server with ample memory and CPU cores. You also want to ensure you opt for dedicated CPU cores, not shared ones. Dedicated CPU cores will give you much more consistent performance because, as the name suggests, those cores are reserved for your server's sole use. Shared cores are shared with neighboring instances, and CPU contention will be an issue. Meaning your server will have to wait its turn if neighboring instances are already using the CPU. This can cause fluctuations in time to first byte (TTFB) and a slow response time for users.
As the server will host the entire web server stack, a 2:1 ratio of memory to CPU cores is optimal for smaller servers. This will ensure that MySQL and Redis have enough memory and that there are plenty of CPU cores to handle web traffic. I'd recommend a minimum of 4GB/2vCPUs, which will set you back $42/month on DigitalOcean. As the server size increases, you may be able to scale back on the number of CPU cores, but this will depend on your application and traffic. For example, a 32GB/8vCPUs server (4:1 ratio of memory to CPU cores) might give you all the needed performance while keeping costs in check.
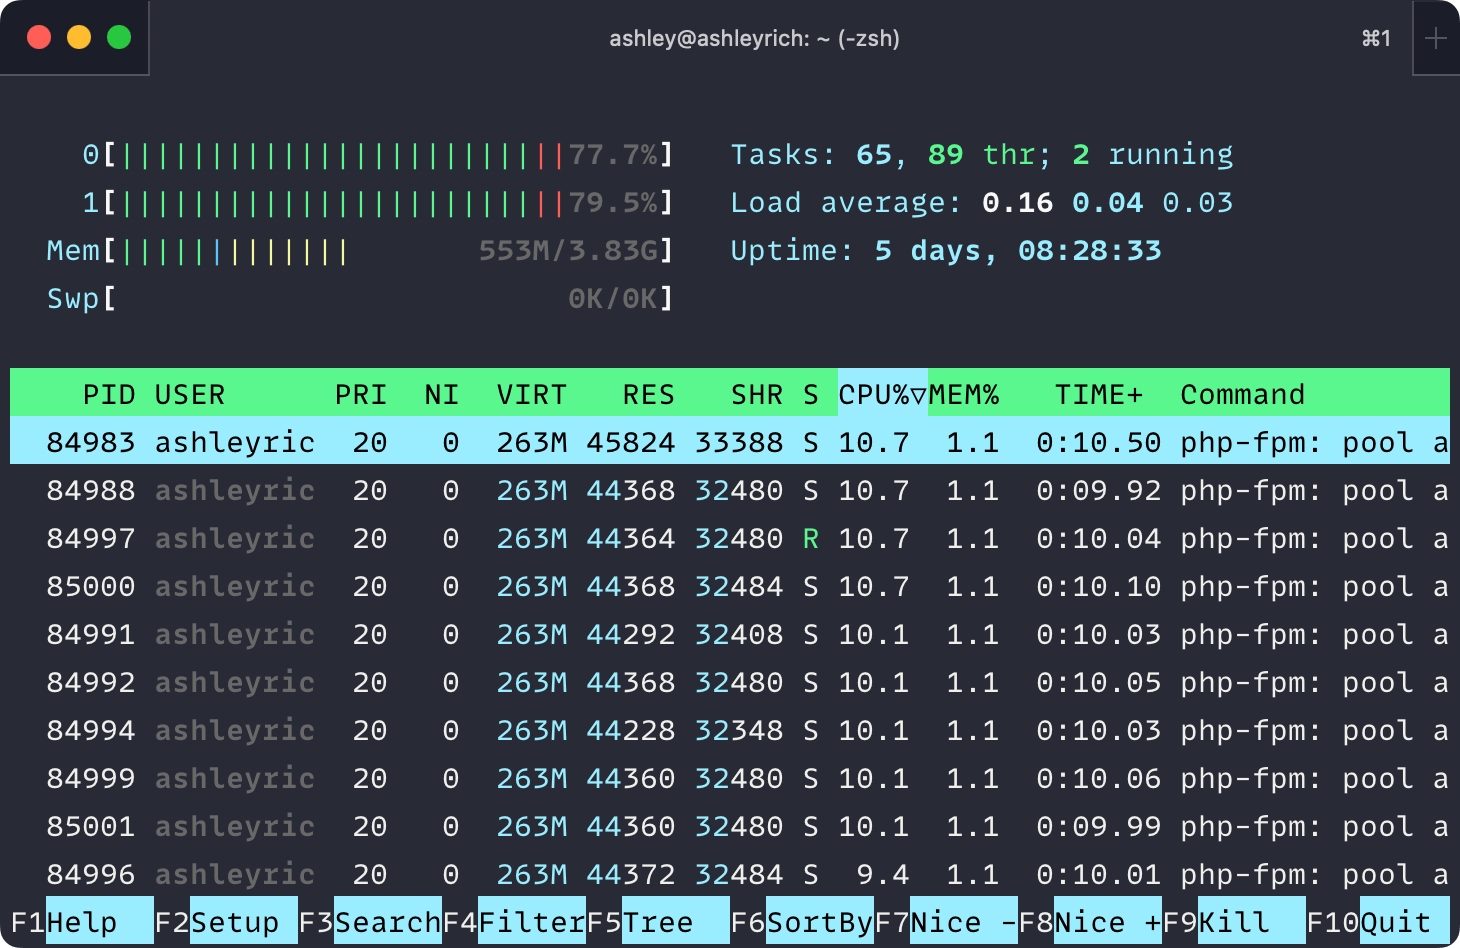
There's no exact science when choosing a server size. Often, you'll need to benchmark your chosen hardware to see how your application fares. You can use tools such as k6 and monitor your site's resources in real-time using htop.
 When benchmarking, remember to simulate your peak traffic. It's no good simulating your average traffic only to find that the server comes to a grinding halt during busy periods. Your peak traffic might be the same hour every day or more seasonal, such as during Black Friday sales.
Continually monitor server resources
Once your application is deployed, you'll need a way to monitor server resources. Even if you regularly SSH to the server and inspect htop, you'll want something more automated. This is important for two reasons:
You'll build a picture of how your server is performing. If your average CPU utilization is increasing by 2% each month due to increased traffic, you can plan when to scale resources.
Threshold alerting can be configured to send a notification when a server resource hits a specific value. For example, you might like to be notified when your server's CPU, memory, or disk space hits 80%.
One of the biggest mistakes I see people make when managing their servers is being reactive instead of proactive - they wait for the shit to hit the fan. I've seen servers become completely inaccessible due to full disk space, resulting in them being offline for hours and having to be restored via the VPS provider's console. Threshold alerts would have surfaced that disk space was becoming an issue and prevented the outage.
SpinupWP doesn't currently offer server monitoring (although it's planned for the future). Therefore, you need to configure monitoring yourself. Thankfully, most VPS providers offer their own monitoring services, which will give you essential insights into CPU, memory, and disk space utilization, as well as threshold alerting. Make sure you enable server monitoring and that utilization alerts are seen. I can't stress how important this is and how many headaches you'll save yourself.
Optimize PHP-FPM for high throughput
For security purposes, SpinupWP implements site isolation. In practical terms, this means that each site runs as its own Unix user and has a dedicated PHP-FPM pool. A PHP-FPM pool is simply a manager process and a number of child processes that handle incoming PHP requests from Nginx. The more child processes, the more concurrent connections the server can handle.
The default PHP-FPM pool config isn't suitable for high throughput, as there's a limit of 5 child processes per pool. For high-traffic WordPress sites serving dynamic content, you'll quickly start to see the following PHP errors:
WARNING: [pool xxx] server reached pm.max_children setting (5), consider raising itWorse, users will receive 504 Gateway Timeout errors in the browser. When I say dynamic content, I mean pages that aren't page cached, such as the WordPress dashboard or WooCommerce checkout pages. Sites that are predominantly page cached will be able to handle substantially more concurrent users because Nginx will serve up a static HTML version of the requested page without forwarding the request to PHP-FPM.
In addition to configuring the number of PHP-FPM child processes, you can also tweak how the pool manager spawns those processes. A dynamic configuration is used by default, which scales processes up and down as required. Think of it like autoscaling but at a PHP level. This helps to preserve memory, as each child process spawned will continue to consume memory, even when idle. However, a static configuration is better when optimizing PHP-FPM for high throughput. That is, we'll happily sacrifice some system memory to ensure there are enough child processes to handle connections as quickly as possible.
Each pool has its own config, which is stored in the PHP versions pool.d directory. The file will be named after the site's system user.
$ sudo nano /etc/php/8.1/fpm/pool.d/USERNAME.confFind the pm directive and change its value to static.
pm = staticNext, you'll want to bump up pm.max_children, which controls the total number of child processes. A value of 20 will ensure there are always 20 PHP processes waiting to handle incoming requests.
pm.max_children = 20The remaining pm.* directives can be ignored. Save the changes and restart PHP-FPM for the changes to take effect:
$ sudo service php8.1-fpm restartYou'll want to check htop after making those changes to see how they impact total memory usage. It can take a little trial and error as you figure out the best pm.max_children setting to ensure there are enough PHP workers without sacrificing too much memory.
Rein in Redis memory usage
SpinupWP speeds up dynamic pages by enabling a persistent object cache via Redis. When a database query is performed, the results are stored in Redis for quicker retrieval on subsequent requests. Redis is an in-memory datastore meaning cache retrieval is extremely quick because data is stored in your server's memory. However, Redis can quickly eat into your server's memory, especially for larger sites. Worse, Redis will use all available server memory (if needed) by default.
When a server runs low on memory, the out-of-memory (OOM) killer will kick in and start killing processes. This is a self-preservation mechanism to prevent the server from crashing. The OOM killer doesn't take prisoners, nor will it consider what services are required to keep your WordPress site online. Therefore, Redis, MySQL, or PHP-FPM often get axed, all of which are required to serve WordPress (although Redis isn't required to serve WordPress, it will cause havoc for dynamic pages because the object-cache.php drop-in will continue attempting to connect to Redis until a timeout occurs). We must avoid this situation by configuring Redis to be more conservative with memory.
Open redis.conf in the editor of your choice:
$ sudo nano /etc/redis/redis.confFind the section titled "MEMORY MANAGEMENT" and uncomment maxmemory. Set an appropriate value in bytes. Here, I'm setting a limit of 512MB:
maxmemory 512000000When Redis reaches its max memory limit, the default behavior is noeviction, which will throw an error when attempting to write data. If you hit maxmemory, you'll flood your debug.log file with errors.
Instead, you can instruct Redis to remove keys when the memory limit is reached, thus freeing up room for new keys. Several eviction policies exist, but I lean towards allkeys-lru, which evicts the least recently used keys. Uncomment maxmemory-policy and set your preferred eviction policy. All of the policies are documented above the configuration option, so I won't list them here.
maxmemory-policy allkeys-lruSave the changes and restart Redis for the changes to take effect:
$ sudo service redis-server restartIf your site is highly-dynamic and relies heavily on object caching, you'll want to check out Object Cache Pro. It's extremely efficient and can be configured to serialize and compress data, which can reduce Redis memory usage by up to 80%.
Consider swap space
To further mitigate against out-of-memory errors, you may want to consider enabling swap space, as SpinupWP does not configure it. Swap space is a portion of the server's hard drive reserved for the OS to store data that doesn't fit in memory. However, swap should be seen as a safety net to prevent the server from reaching memory exhaustion. It's not a cheap method of increasing your server's memory. Reading data from swap is much slower than memory, so performance will suffer. If your server is consistently dipping into swap, it's time to upgrade the server to one with more memory.
I don't enable swap space; instead, I always provision a server with enough memory plus a few gigabytes for wiggle room. However, if you choose to go down that route, DigitalOcean has you covered in their guide to enabling swap space.
In closing
Optimizing SpinupWP sites for high-traffic and optimal performance isn't complicated. Sever selection alone will go a long way to improving your success on SpinupWP. If your site is heavily page cached, the additional optimizations in this post likely won't be required. But do yourself a favor and turn on server monitoring! Don't wait for the shit to hit the fan.
